# \[Use-case w/ Hands-on] Azure ML에서 torchtune을 사용한 언어 모델 미세 조정/평가/양자화
> *이 글은 저자가 마이크로소프트 AIML 기술 커뮤니티에 기고한* [*Fine-tune/Evaluate/Quantize SLM/LLM using the torchtune on Azure ML*](https://techcommunity.microsoft.com/blog/machinelearningblog/fine-tuneevaluatequantize-slmllm-using-the-torchtune-on-azure-ml/4285663) *을 직접 한국어로 번역 및 편집하였습니다.*
Azure ML에서 torchtune을 활용해 소형 및 대형 언어 모델(SLM/LLM)을 효과적으로 파인 튜닝하고 평가하며 양자화 하는 방법을 살펴보겠습니다.
대규모 언어 모델에 대한 수요가 증가함에 따라 파인 튜닝 및 최적화를 더 쉽게 수행할 수 있는 견고한 툴킷이 필요합니다. torchtune은 분산 훈련, 유연한 로깅, 평가, 모델 양자화의 일련의 과정을 쉽게 수행하게 도와주는 라이브러리입니다. Azure ML은 확장 가능한 인프라 및 통합 옵션을 제공하여 torchtune을 보완하므로 SLM/LLM을 실험하고 배포하는 데 이상적인 관리형 서비스입니다.
본 가이드에서는 다음을 위한 실습 코드 예제와 단계별 지침을 제공합니다.
* 파인 튜닝 및 분산 훈련을 위한 Azure ML 설정 및 torchtune 연동 방법
* Azure Blob Storage 마운트 환경에서 YAML 레시피의 동적 경로 조정 처리 방법
* 컴퓨팅 리소스가 제한된 디바이스에 배포하기 위해 모델을 최적화하는 양자화 적용 방법
이 가이드를 마치면 여러분은 torchtune과 Azure ML을 활용해 확장 가능하고 효율적인 SLM/LLM 파이프라인을 실행하고, 모델의 성능과 접근성을 높이는 방법을 익히게 됩니다.
#### 🔥 핸**즈온랩:** [**https://github.com/Azure/torchtune-azureml**](https://github.com/Azure/torchtune-azureml)
## 1. 개요
***
### 1.1. torchtune
torchtune은 SLM/LLM 모델을 손쉽게 파인 튜닝하도록 설계된 Python 라이브러리입니다. torchtune은 단순성과 유연성이 뛰어나며, 사용자는 YAML 기반 레시피를 통해 최소한의 코드로 파인 튜닝, 평가 및 양자화를 손쉽게 수행할 수 있습니다. 사용자는 구조화되고 가독성이 높은 YAML 포맷으로 복잡한 훈련 설정을 구성을 정의하고 조정할 수 있기에, 훈련 코드를 일일이 작성할 필요가 없습니다. torchtune은 YAML 레시피 기반 설정 파일로 실험 프로세스를 가속화하고 다양한 모델과 작업에서 설정 파일을 쉽게 복제하거나 수정할 수 있습니다. 이러한 접근 방식은 파인 튜닝에서 모델 배포까지의 프로세스를 간소화하는데 이상적입니다.
* **손쉬운 모델 튜닝**: torchtune은 SLM 파인 튜닝 과정을 간소화하는 PyTorch 네이티브 라이브러리로, AI 전문 지식이 없는 사용자도 사용할 수 있습니다.
* **분산 훈련의 간편한 적용**: torchtune은 분산 훈련을 위한 설정을 간소화하여 사용자가 최소한의 구성으로 다중 GPU에 걸쳐 모델을 확장할 수 있도록 합니다. 이 기능은 사용자의 시행착오를 크게 줄여줍니다.
* **간소화된 모델 평가 및 양자화**: torchtune은 모델 평가 및 양자화를 간소화하여 모델 성능을 쉽게 평가하고 배포를 위해 모델을 최적화하는 기능을 제공합니다.
* **확장성 및 이식성**: torchtune은 다양한 클라우드 플랫폼과 로컬 환경에서 사용할 수 있을 만큼 유연하며, Azure ML과 쉽게 통합할 수 있습니다.
torchtune에 대한 자세한 내용은 [공식 사이트](https://pytorch.org/torchtune/stable/index.html)를 참조 바랍니다.
### 1.2. Azure ML에 torchtune 연동
Azure ML에서 torchtune 실행 시 GenAI 워크플로를 간소화하는 몇 가지 이점을 알아보겠습니다.
* **확장성 및 컴퓨팅 성능**: Azure ML은 강력하고 확장 가능한 컴퓨팅 리소스를 제공하기에 torchtune이 멀티 GPU 또는 분산 클러스터에서 다중 SLM/LLM을 처리할 수 있습니다. 따라서 대규모 데이터 세트에서 파인 튜닝 및 양자화와 같은 집약적인 작업을 효율적으로 관리하는 데 이상적입니다.
* **관리형 ML 환경**: Azure ML은 완전 관리형 환경을 제공하므로 종속성 설정 및 버전 관리가 용이합니다. torchtune을 위한 설정 시간이 단축되므로 사용자는 인프라 설정에 대한 부담 없이 모델 최적화에 집중할 수 있습니다.
* **모델 배포 및 확장**: Azure ML은 Azure의 클라우드 인프라에 배포할 수 있는 간단한 경로를 제공하여 강력한 모니터링 및 확장 기능으로 애플리케이션을 프로덕션으로 쉽게 확장할 수 있습니다.
* **타 Azure 서비스와의 원활한 통합**: 사용자는 데이터 세트 저장을 위한 Azure Blob Storage 또는 데이터 관리를 위한 Azure SQL과 같은 다른 Azure 서비스를 활용할 수 있습니다. 이러한 생태계 지원으로 워크플로 효율성이 향상되므로 AzureML은 torchtune 기반 모델 튜닝 및 배포를 위한 강력한 설루션이 됩니다.
## 2. torchtune YAML 설정
***
torchtune YAML 구성에서 각 매개변수와 설정은 대규모 언어 모델(LLM)을 파인 튜닝하기 위한 구체적인 학습 방식을 제어합니다. 다음은 SFT (Supervised Fine-Tuning; 지도 파인 튜닝), DPO (Direct Preference Optimization; 직접 선호도 최적화), KD (Knowledge Distillation; 지식 증류), 평가, 양자화와 같은 주요 구성 요소에 대한 세부 정보입니다.
* **SFT (Supervised Fine-Tuning)**: 이 설정은 레이블링된 데이터 세트로 모델을 훈련합니다. 여기에는 데이터 세트 경로, 배치 크기, 학습 속도 및 에포크 수를 지정하는 것이 포함됩니다. SFT는 레이블 데이터를 사용하여 사전 훈련된 모델을 특정 작업에 맞게 튜닝하는 데 매우 중요합니다.
* **DPO (Direct Preference Optimization)**: 이 설정은 사람의 선호도 데이터를 기반으로 모델을 학습시키는 데 사용됩니다. 일반적으로 보상 모델을 사용하여 결과물의 순위를 매기고, 선호하는 응답에 대해 모델이 직접 최적화하도록 안내합니다.
* **KD (Knowledge Distillation)**: 이 설정에서는 더 크고 더 정확한 모델(교사)이 더 작은 모델(학생)에게 지식을 전달합니다. YAML 설정은 교사 및 학생 모델 경로, temperature (확률 평활화용), alpha (교사 예측과 레이블 간의 손실 균형을 맞추기 위한 가중치)를 정의할 수 있습니다. KD를 사용하면 작은 모델이 큰 모델의 성능을 모방하면서 계산 요구 사항을 줄일 수 있습니다.
* **평가 (Evaluation)**: torchtune은 EleutherAI의 LM 평가 Harness와 원활하게 통합되어 TruthfulQA와 같은 벤치마크를 사용하여 모델의 진실성과 정확성을 평가할 수 있습니다.
* **양자화**: 이 설정은 모델 가중치의 비트 정밀도를 낮춰 모델 크기와 계산 요구 사항을 줄입니다. YAML 설정 파일을 통해 양자화 방법(예: 8비트 또는 4비트), 대상 레이어, 그리고 아마도 훈련 후 양자화를 위한 추가 매개변수를 지정합니다. 이는 리소스가 제한된 에지 디바이스에 모델을 배포하는 데 특히 유용합니다.
torchtune은 코드를 작성하지 않고도 YAML 파일 설정만으로 위의 레시피들을 쉽게 적용할 수 있습니다. [torchtune 공식 웹사이트](https://github.com/pytorch/torchtune)에서 YAML 샘플들을 확인하기 바랍니다.
## 3. Azure ML 훈련 꿀팁
***
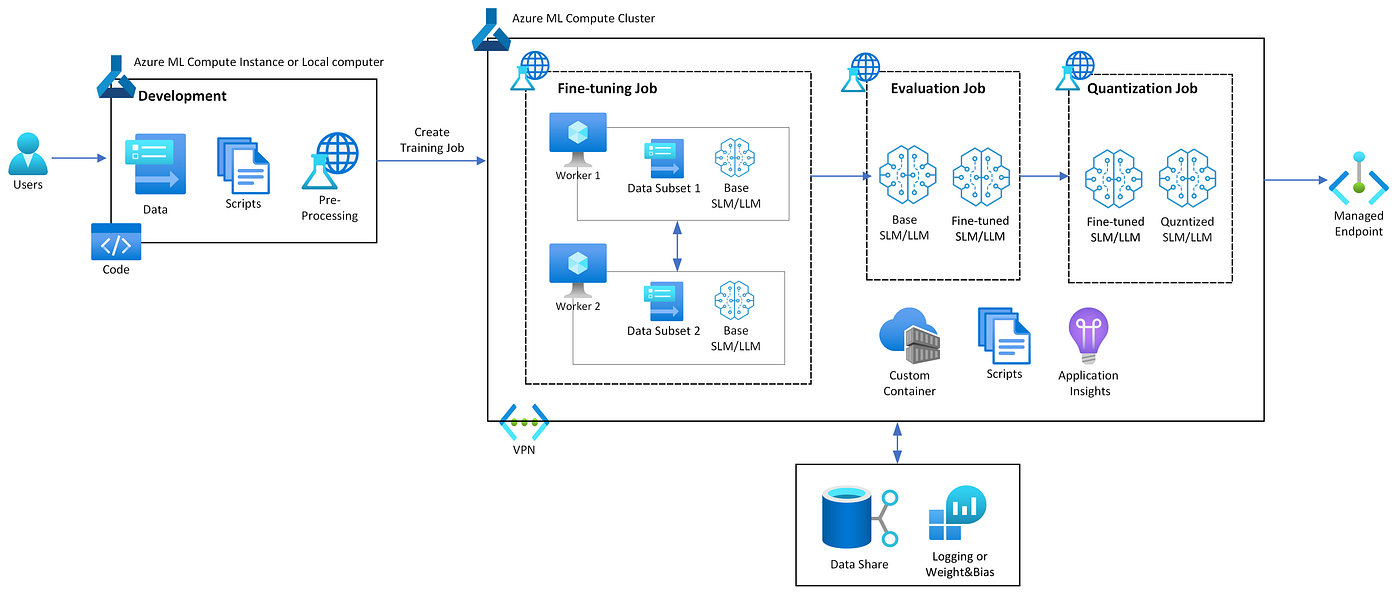
Azure ML에 torchtune의 독립 실행형(standalone) 명령을 적용하는 것은 매우 간단합니다. 그러나 아키텍처에 표현된 대로 허깅페이스 모델 다운로드-파인 튜닝-평가-양자화 파이프라인을 적용하려면 시행착오가 필요합니다. 따라서 아래의 꿀팁을 참조하여 여러분의 워크로드에 적용할 때 시행착오를 최소화하세요.
### **3.1. 모델 다운로드**
`torch_distributed_zero_first` 데코레이터(decorator)는 단일 프로세스(일반적으로 분산 설정에서 rank 0)만 모델 다운로드 또는 로드와 같은 특정 작업을 수행하도록 하는 데 사용됩니다. 이 접근 방식은 여러 프로세스가 동시에 모델을 로드하려고 시도하여 중복 다운로드, 과도한 메모리 사용 또는 충돌이 발생할 수 있는 분산 환경에서 매우 중요합니다.
`torch_distributed_zero_first`를 사용하여 단일 프로세스에서 모델을 다운로드해야 하는 이유를 몇 가지 들어보겠습니다.
1. **중복 다운로드 방지**: 분산 설정에서 모든 프로세스가 동시에 모델을 다운로드하려고 하면 불필요한 네트워크 트래픽과 중복 파일 저장소가 발생할 수 있습니다. `torch_distributed_zero_first`는 하나의 프로세스만 모델을 다운로드하도록 하여 이러한 중복을 방지합니다.
2. **충돌 및 파일 손상 방지**: 여러 프로세스가 다운로드 중에 동일한 파일을 쓰거나 수정하려고 하면 파일 손상 또는 액세스 충돌이 발생할 수 있습니다. `torch_distributed_zero_first`는 하나의 프로세스만 파일 다운로드를 처리하도록 허용하여 이러한 위험을 최소화합니다.
다운로드가 완료된 모델은 모든 프로세스에 걸쳐 분산되거나 메모리에 로드됩니다. 이 접근 방식은 다중 프로세스 환경에서 모델 로딩 프로세스를 보다 효율적이고 안정적으로 만듭니다.
### 3.2. 프로세스 그룹 종료
torchtune의 CLI로 Azure ML에 분산 훈련을 적용할 때는 프로세스 그룹을 신중하게 관리하는 것이 필수적입니다. torchtune CLI(Command Line Interface)의 분산 훈련 레시피는 `dist.init_process_group(…`)을 사용하여 프로세스 그룹을 초기화합니다. 그러나 프로세스 그룹이 이미 활성화된 경우 다른 프로세스 그룹을 초기화하면 충돌이 발생하여 중첩되거나 중복된 프로세스 그룹이 발생하게 됩니다.
이를 방지하려면 torchtune의 분산 훈련이 시작되기 전에 기존 프로세스 그룹을 모두 종료해야 합니다. 이는 `dist.destroy_process_group(…)`을 호출하여 활성 프로세스 그룹을 종료하여 깨끗한 상태를 유지함으로써 수행할 수 있습니다. 이렇게 하면 프로세스 충돌을 방지하여 기존 그룹과 겹치지 않고 torchtune CLI의 분산 훈련 레시피가 원활하게 작동하게 됩니다. 3.1절과 3.2절의 코드 스니펫은 아래와 같습니다.
```python
MASTER_ADDR = os.environ.get('MASTER_ADDR', '127.0.0.1')
MASTER_PORT = os.environ.get('MASTER_PORT', '7777')
WORLD_SIZE = int(os.environ.get("WORLD_SIZE", 1))
GLOBAL_RANK = int(os.environ.get('RANK', -1))
LOCAL_RANK = int(os.environ.get('LOCAL_RANK', -1))
NUM_GPUS_PER_NODE = torch.cuda.device_count()
NUM_NODES = WORLD_SIZE // NUM_GPUS_PER_NODE
if LOCAL_RANK != -1:
dist.init_process_group(backend="nccl" if dist.is_nccl_available() else "gloo")
@contextmanager
def torch_distributed_zero_first(local_rank: int):
"""
Decorator to make all processes in distributed training
wait for each local_master to do something.
"""
if local_rank not in [-1, 0]:
dist.barrier(device_ids=[local_rank])
yield
if local_rank == 0:
dist.barrier(device_ids=[0])
...
with torch_distributed_zero_first(LOCAL_RANK):
# Download the model
download_model(args.teacher_model_id, args.teacher_model_dir)
download_model(args.student_model_id, args.student_model_dir)
# Construct the fine-tuning command
if "single" in args.tune_recipe:
print("***** Single Device Training *****");
full_command = (
f'tune run '
f'{args.tune_recipe} '
f'--config {args.tune_config_name}'
)
# Run the fine-tuning command
run_command(full_command)
else:
print("***** Distributed Training *****");
dist.destroy_process_group()
if GLOBAL_RANK in {-1, 0}:
# Run the fine-tuning command
full_command = (
f'tune run --master-addr {MASTER_ADDR} --master-port {MASTER_PORT} --nnodes {NUM_NODES} --nproc_per_node {NUM_GPUS_PER_NODE} '
f'{args.tune_recipe} '
f'--config {args.tune_config_name}'
)
run_command(full_command)
...and more...
```
### 3.3. 동적 설정 (Dynamic Configuration)
컴퓨팅 클러스터에 마운트된 Azure Blob 스토리지의 경로는 동적이므로, YAML 레시피는 동적으로 수정해야 합니다. 다음은 Jinja 템플릿을 사용하여 설정 파일을 조정하여 런타임에 경로가 올바르게 설정되도록 하는 방법의 한 예시입니다.
```yaml
# Dynamically modify fine-tuning YAML file.
import os, jinja2
jinja_env = jinja2.Environment()
template = jinja_env.from_string(Path(args.tune_config_name).open().read())
train_path = os.path.join(args.train_dir, "train.jsonl")
metric_logger = "DiskLogger"
if len(args.wandb_api_key) > 0:
metric_logger = "WandBLogger"
Path(args.tune_config_name).open("w").write(
template.render(
train_path=train_path,
log_dir=args.log_dir,
model_dir=args.model_dir,
model_output_dir=args.model_output_dir,
metric_logger=metric_logger
)
)
```
lora\_finetune.yaml 코드 스니펫
```yaml
# Model arguments
model:
...
# Tokenizer
tokenizer:
_component_: torchtune.models.phi3.phi3_mini_tokenizer
path: {{model_dir}}/tokenizer.model
max_seq_len: null
# Checkpointer
checkpointer:
_component_: torchtune.training.FullModelHFCheckpointer
checkpoint_dir: {{model_dir}}
checkpoint_files: [
model-00001-of-00002.safetensors,
model-00002-of-00002.safetensors
]
recipe_checkpoint: null
output_dir: {{model_output_dir}}
model_type: PHI3_MINI
resume_from_checkpoint: False
save_adapter_weights_only: False
# Dataset
dataset:
_component_: torchtune.datasets.instruct_dataset
source: json
data_files: {{train_path}}
column_map:
input: instruction
output: output
train_on_input: False
packed: False
split: train
seed: null
shuffle: True
# Logging
output_dir: {{log_dir}}/lora_finetune_output
metric_logger:
_component_: torchtune.training.metric_logging.{{metric_logger}}
log_dir: {{log_dir}}/training_logs
log_every_n_steps: 1
log_peak_memory_stats: False
...
```
이 설정에서는
1. 스크립트가 템플릿 YAML 파일을 읽고 적절한 경로와 구성을 동적으로 삽입합니다.
2. `train_path, log_dir, model_dir, model_output_dir`은 환경의 동적으로 할당된 경로를 기반으로 채워져 YAML 파일이 실제 저장 위치를 반영하도록 합니다.
3. `metric_logger`는 기본적으로 “`DiskLogger`”로 설정되지만 사`wandb_api_key`를 제공하면 “`WandBLogger`”로 변경되어 유연한 메트릭 로깅 구성이 가능합니다.
이 접근 방식은 Azure ML의 Azure Blob 스토리지 마운팅에 의해 경로가 동적으로 할당되는 경우에도 설정 파일이 항상 환경과 동기화되도록 보장합니다.
### 3.4. 로깅
torchtune CLI로 훈련 파이프라인을 실행할 때 로깅에 MLflow를 사용하는 것이 어렵습니다. 대신 torchtune의 `DiskLogger` 또는 `WandBLogger`를 사용해야 합니다.\
`DiskLogger` 옵션은 지표(metric)과 훈련 정보를 디스크(예: Blob 스토리지)에 직접 기록하므로 MLFlow를 사용할 수 없는 경우에 적합합니다. 또는 Weight\&Bias (WandB) 계정과 API 키가 있는 경우, `WandBLogger`를 사용하여 WandB 대시보드에 지표를 기록하여 원격 액세스와 훈련 진행 상황의 시각화가 가능합니다. 이렇게 하면 torchtune 프레임워크 내에서 강력한 로깅 및 모니터링이 가능합니다.
## 4. Azure ML 훈련
***
이 섹션을 읽기 전에 Azure ML 훈련 및 서빙에 대한 기본 가이드는 Azure 공식 가이드와 지난 블로그([블로그 1](https://techcommunity.microsoft.com/blog/machinelearningblog/finetune-small-language-model-slm-phi-3-using-azure-machine-learning/4130399), [블로그 2](https://techcommunity.microsoft.com/blog/machinelearningblog/fine-tuning-florence-2-for-vqa-visual-question-answering-using-the-azure-ml-pyth/4181123))를 참조하세요.
#### 4.1. 데이터 세트 준비
torchtune은 여러 데이터 세트 옵션을 제공하지만, 이 블로그에서는 허깅페이스 데이터 세트를 json으로 저장하고 Azure Blob 데이터 스토어에 Data asset으로 저장하는 방법을 소개합니다. 데이터 세트를 직접 빌드하고 증강하는 법은 [합성 데이터 생성을 다루는 블로그](https://techcommunity.microsoft.com/blog/azure-ai-services-blog/generate-synthetic-qnas-from-real-world-data-on-azure/4202053)와 [깃허브 리포지토리](https://github.com/Azure/synthetic-qa-generation)를 참조하기 바랍니다.
#### SFT와 KD에 사용하는 Instruction 데이터 세트
데이터 세트를 전처리하는 것은 어렵지 않지만 열 이름을 yaml 파일의 사양과 일치하도록 변환하는 것을 잊지 마세요.
```python
dataset = load_dataset("HuggingFaceH4/helpful_instructions", name="self_instruct", split="train[:10%]")
dataset = dataset.rename_column('prompt', 'instruction')
dataset = dataset.rename_column('completion', 'output')
print(f"Loaded Dataset size: {len(dataset)}")
if IS_DEBUG:
logger.info(f"Activated Debug mode. The number of sample was resampled to 1000.")
dataset = dataset.select(range(800))
print(f"Debug Dataset size: {len(dataset)}")
logger.info(f"Save dataset to {SFT_DATA_DIR}")
dataset = dataset.train_test_split(test_size=0.2)
train_dataset = dataset['train']
train_dataset.to_json(f"{SFT_DATA_DIR}/train.jsonl", force_ascii=False)
test_dataset = dataset['test']
test_dataset.to_json(f"{SFT_DATA_DIR}/eval.jsonl", force_ascii=False)
```
#### DPO용 Preference 데이터 세트
Preference 데이터 세트의 경우 채팅 템플릿 형식으로 변환해야 합니다. 아래는 코드 예제입니다.
```python
def convert_to_preference_format(dataset):
json_format = [
{
"chosen_conversations": [
{"content": row["prompt"], "role": "user"},
{"content": row["chosen"], "role": "assistant"}
],
"rejected_conversations": [
{"content": row["prompt"], "role": "user"},
{"content": row["rejected"], "role": "assistant"}
]
}
for row in dataset
]
return json_format
# Load dataset from the hub
data_path = "jondurbin/truthy-dpo-v0.1"
dataset = load_dataset(data_path, split="train")
print(f"Dataset size: {len(dataset)}")
# if IS_DEBUG:
# logger.info(f"Activated Debug mode. The number of sample was resampled to 1000.")
# dataset = dataset.select(range(800))
logger.info(f"Save dataset to {DPO_DATA_DIR}")
dataset = dataset.train_test_split(test_size=0.2)
train_dataset = dataset['train']
test_dataset = dataset['test']
train_dataset = convert_to_preference_format(train_dataset)
test_dataset = convert_to_preference_format(test_dataset)
with open(f"{DPO_DATA_DIR}/train.jsonl", "w") as f:
json.dump(train_dataset, f, ensure_ascii=False, indent=4)
with open(f"{DPO_DATA_DIR}/eval.jsonl", "w") as f:
json.dump(test_dataset, f, ensure_ascii=False, indent=4)
```
### 4.2. Environment asset
큐레이팅된 환경을 기반으로 명령에 `pip install`을 추가하거나 conda 기반 사용자 지정 환경을 추가할 수 있지만 이 블로그에서는 docker 기반 사용자 지정 환경을 추가하겠습니다. 아래는 Dockerfile 예시입니다.
```docker
FROM mcr.microsoft.com/aifx/acpt/stable-ubuntu2004-cu124-py310-torch241:biweekly.202410.2
# Install pip dependencies
COPY requirements.txt .
RUN pip install -r requirements.txt --no-cache-dir
# Inference requirements
COPY --from=mcr.microsoft.com/azureml/o16n-base/python-assets:20230419.v1 /artifacts /var/
RUN /var/requirements/install_system_requirements.sh && \
cp /var/configuration/rsyslog.conf /etc/rsyslog.conf && \
cp /var/configuration/nginx.conf /etc/nginx/sites-available/app && \
ln -sf /etc/nginx/sites-available/app /etc/nginx/sites-enabled/app && \
rm -f /etc/nginx/sites-enabled/default
ENV SVDIR=/var/runit
ENV WORKER_TIMEOUT=400
EXPOSE 5001 8883 8888
# support Deepspeed launcher requirement of passwordless ssh login
RUN apt-get update
RUN apt-get install -y openssh-server openssh-client
RUN MAX_JOBS=4 pip install flash-attn==2.6.3 --no-build-isolation
```
> \[팁] Ubuntu 22.04로 컨테이너를 빌드하는 경우 `liblttng-ust0` 관련 패키지/종속성을 제거해야 합니다. 그렇지 않으면 컨테이너를 빌드할 때 오류가 발생합니다. 아래의 코드 스니펫을 참조하기 바랍니다.
```docker
FROM mcr.microsoft.com/aifx/acpt/stable-ubuntu2204-cu124-py310-torch250:biweekly.202410.2
...
# Remove packages or dependencies related to liblttng-ust0.
# Starting from Ubuntu 22.04, liblttng-ust0 has been updated to liblttng-ust1 package, deprecating liblttng-ust0 for compatibility reasons.
# If you build a docker file on Ubuntu 22.04 without including this syntax, you will get the following liblttng-ust0 error:
# -- Package 'liblttng-ust0' has no installation candidate
RUN sed -i '/liblttng-ust0/d' /var/requirements/system_requirements.txt
...
```
### 4.3. 훈련 작업 시작
아래 코드 스니펫은 훈련 작업을 위한 컴퓨팅 클러스터를 활성화합니다. 이 명령(`command`)을 통해 사용자는 다음과 같은 주요 사항을 구성합니다.
* `inputs` - 명령에 이름 값 쌍을 사용하는 입력 딕셔너리입니다.
* `code` - 명령을 실행할 코드가 있는 경로입니다.
* `compute` - 명령이 실행될 컴퓨팅입니다. 로컬 컴퓨터에서 실행할 수도 있습니다.
* `command` - `${{inputs.}}` 표현식을 사용하여 명령에서 실행해야 하는 명령입니다. 파일이나 폴더를 입력으로 사용하려면 `Input` 클래스를 사용할 수 있습니다. `Input` 클래스는 세 가지 매개변수를 지원합니다:
* `environment` - 명령이 실행되는 데 필요한 환경입니다. 워크스페이스에서 큐레이팅된 (빌트인) 환경 또는 사용자 지정 환경을 사용할 수 있습니다.
* `instance_count` - 노드 수입니다. 기본값은 1입니다.
* `distribution` - 분산 훈련에 사용되는 파라미터입니다. Azure ML은 PyTorch, TensorFlow 및 MPI (Message Passing Interface) 기반 분산 훈련을 지원합니다.
```python
from azure.ai.ml import command
from azure.ai.ml import Input
from azure.ai.ml.entities import ResourceConfiguration
from utils.aml_common import get_num_gpus
num_gpu = get_num_gpus(azure_compute_cluster_size)
logger.info(f"Number of GPUs={num_gpu}")
str_command = ""
if USE_BUILTIN_ENV:
str_env = "azureml://registries/azureml/environments/acpt-pytorch-2.2-cuda12.1/versions/19" # Use built-in Environment asset
str_command += "pip install -r requirements.txt && "
else:
str_env = f"{azure_env_name}@latest" # Use Curated (built-in) Environment asset
if num_gpu > 1:
tune_recipe = "lora_finetune_distributed"
str_command += "python launcher_distributed.py "
else:
tune_recipe = "lora_finetune_single_device"
str_command += "python launcher_single.py "
if len(wandb_api_key) > 0 or wandb_api_key is not None:
str_command += "--wandb_api_key ${{inputs.wandb_api_key}} \
--wandb_project ${{inputs.wandb_project}} \
--wandb_watch ${{inputs.wandb_watch}} "
str_command += "--train_dir ${{inputs.train_dir}} \
--hf_token ${{inputs.hf_token}} \
--tune_recipe ${{inputs.tune_recipe}} \
--tune_action ${{inputs.tune_action}} \
--model_id ${{inputs.model_id}} \
--model_dir ${{inputs.model_dir}} \
--log_dir ${{inputs.log_dir}} \
--model_output_dir ${{inputs.model_output_dir}} \
--tune_config_name ${{inputs.tune_config_name}}"
logger.info(f"Tune recipe: {tune_recipe}")
job = command(
inputs=dict(
#train_dir=Input(type="uri_folder", path=SFT_DATA_DIR), # Get data from local path
train_dir=Input(path=f"{AZURE_SFT_DATA_NAME}@latest"), # Get data from Data asset
hf_token=HF_TOKEN,
wandb_api_key=wandb_api_key,
wandb_project=wandb_project,
wandb_watch=wandb_watch,
tune_recipe=tune_recipe,
tune_action="fine-tune,run-quant",
model_id=HF_MODEL_NAME_OR_PATH,
model_dir="./model",
log_dir="./outputs/log",
model_output_dir="./outputs",
tune_config_name="lora_finetune.yaml"
),
code="./scripts", # local path where the code is stored
compute=azure_compute_cluster_name,
command=str_command,
environment=str_env,
instance_count=1,
distribution={
"type": "PyTorch",
"process_count_per_instance": num_gpu, # For multi-gpu training set this to an integer value more than 1
},
)
returned_job = ml_client.jobs.create_or_update(job)
logger.info("""Started training job. Now a dedicated Compute Cluster for training is provisioned and the environment
required for training is automatically set up from Environment.
If you have set up a new custom Environment, it will take approximately 20 minutes or more to set up the Environment before provisioning the training cluster.
""")
ml_client.jobs.stream(returned_job.name)
```
### 4.4. 로깅
`torchtune.training.metric_logging.DiskLogger` 또는 `torchtune.training.metric_logging.WandBLogger`를 사용하세요. `DiskLogger`를 적용할 때 저장 경로는 출력의 하위 폴더여야 합니다. 그렇지 않으면 Azure ML UI에서 확인할 수 없습니다.\
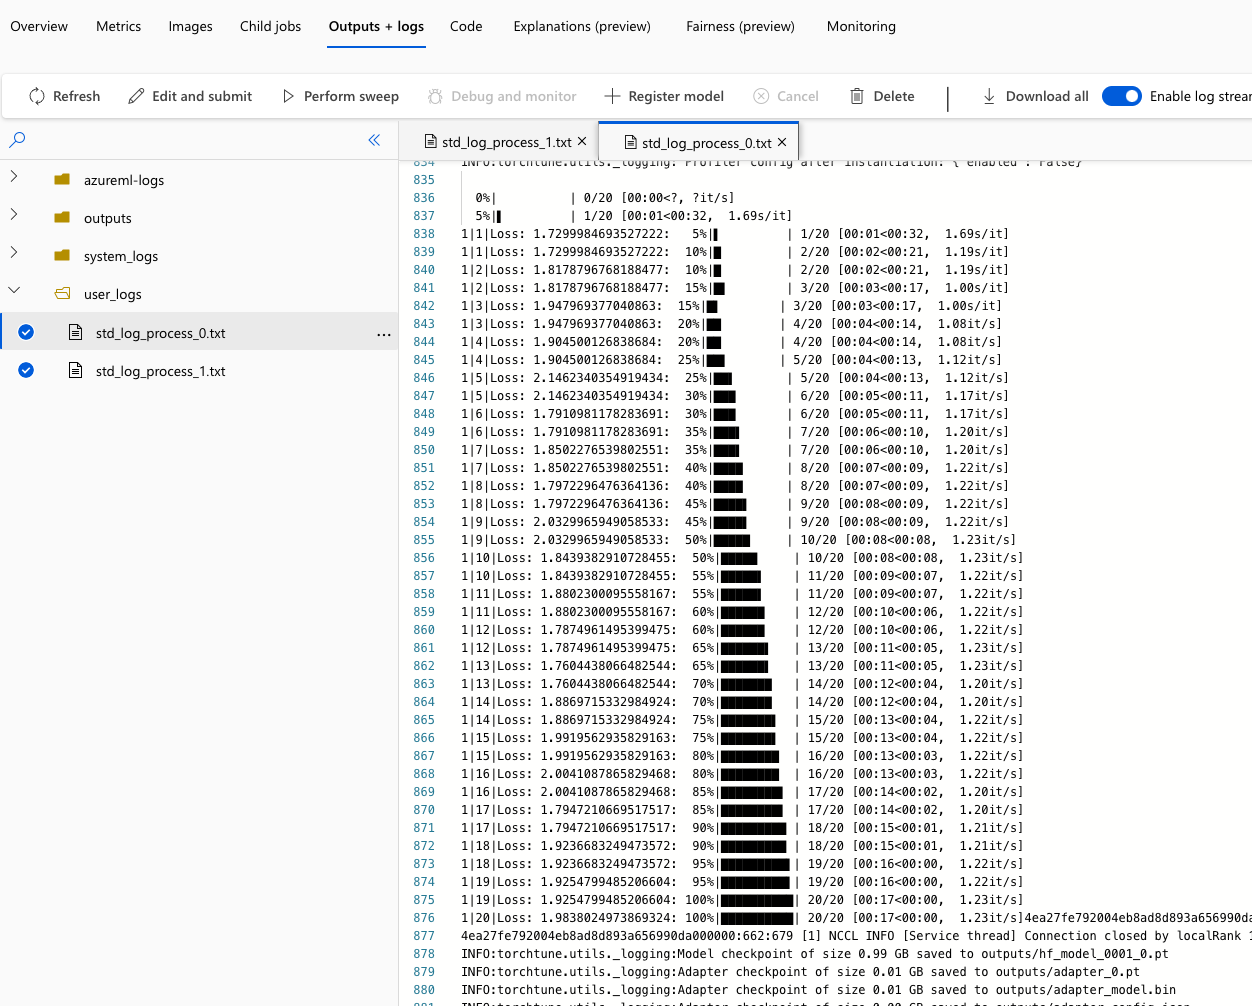
아래는 `DiskLogger`가 적용된 스크린샷입니다.
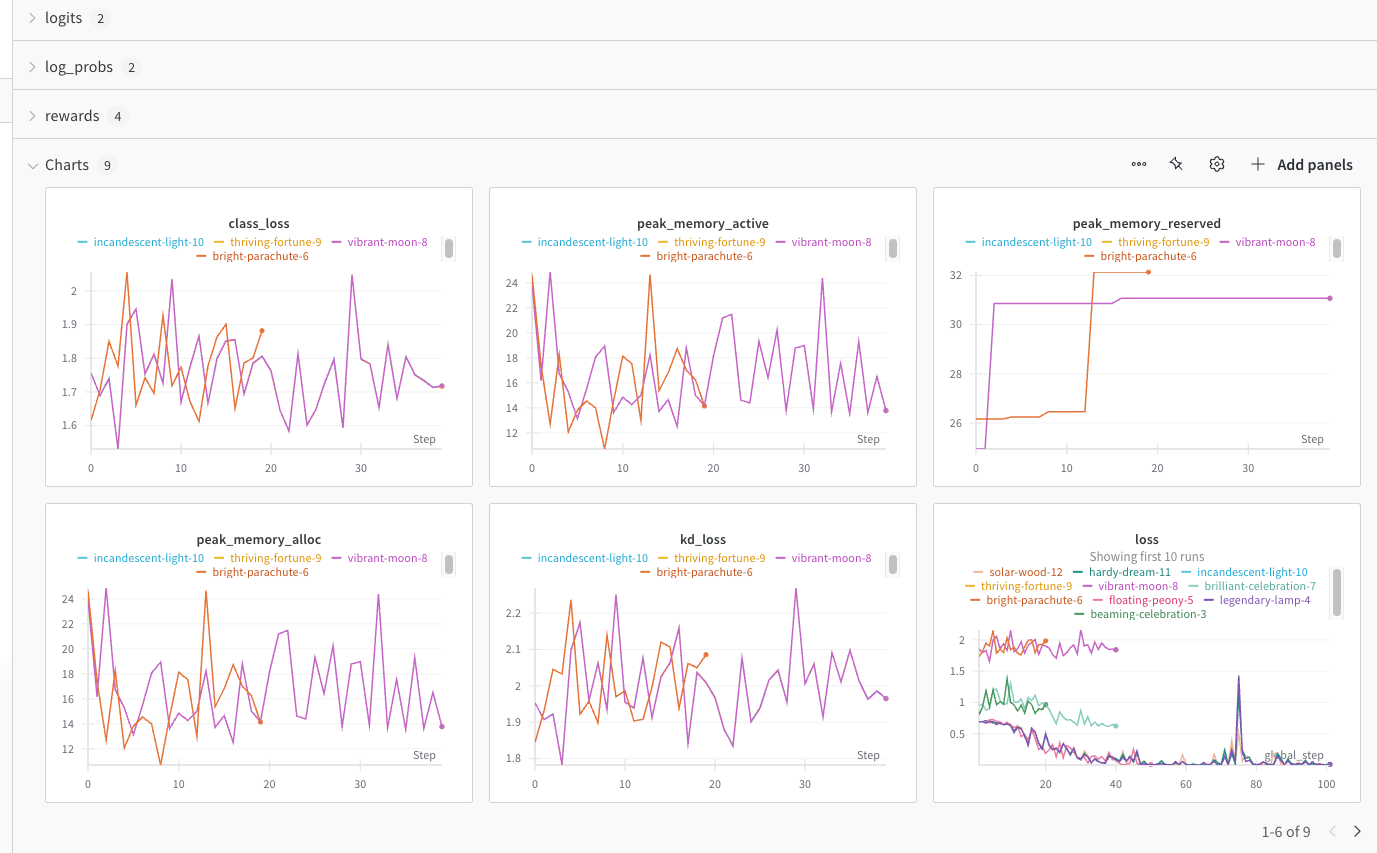
아래는 `WandBLogger`가 적용된 스크린샷입니다.
모든 추가 훈련 기록은 Azure ML의 `user_logs` 폴더에 기록됩니다. 아래는 `Standard_NC48ads_A100_v4`(NVIDIA A100 GPU x 2ea)를 컴퓨팅 클러스터로 사용하는 예시입니다.
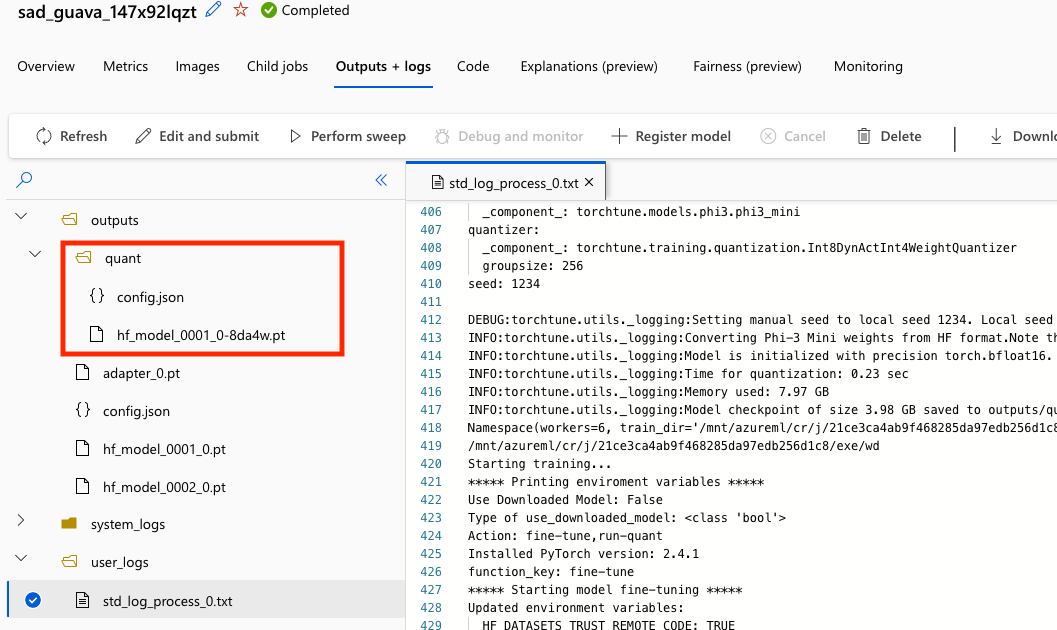
훈련 코드에서 파인 튜닝-평가-양자화 파이프라인을 적용할 때 양자화된 모델 파라미터를 저장하는 것을 잊지 마세요. 향후 상호간 모델 비교를 위해 양자화하기 전의 원래 모델 가중치도 같이 저장하는 것이 좋습니다.
### 4.5. 모델 등록
torchtune으로 모델을 파인 튜닝하고 양자화했으면 Azure ML에 [Model asset](https://learn.microsoft.com/ko-kr/azure/machine-learning/how-to-create-data-assets)으로 등록할 수 있습니다. 이 등록 프로세스는 모델 관리 및 배포를 보다 효율적이고 체계적으로 만들어줍니다. Model asset 등록은 아래와 같은 이점이 있습니다.
* **버전 관리**: Azure ML의 Model asset을 사용하면 모델의 여러 버전을 유지 관리 가능합니다. 다른 파인 튜닝 구성이든 변경된 양자화 방식이든 모델의 각 반복(iteration)을 신규 버전으로 등록할 수 있습니다. 이를 통해 모델 진화를 쉽게 추적하고, 버전 간 성능을 비교하고, 필요한 경우 이전 버전으로 롤백할 수 있습니다.
* **중앙 저장소**: Model asset으로 등록하면 중앙 저장소에 저장됩니다. 이 저장소를 통해 조직 내 다른 팀원이나 프로젝트에서 쉽게 액세스할 수 있으므로 여러 애플리케이션에서 협업하고 일관된 모델을 사용할 수 있습니다.
* **배포 준비 완료**: Azure ML에 에셋으로 등록된 모델은 직접 배포할 수 있습니다. 즉, 등록된 모델을 사용하여 엔드포인트, 일괄 추론 파이프라인 또는 기타 서비스 메커니즘을 설정하여 배포 프로세스를 간소화하고 잠재적인 오류를 최소화할 수 있습니다.
* **메타데이터 관리**: 모델과 함께 관련 메타데이터(예: 훈련 설정, 환경 세부 정보 및 평가 지표)를 Model asset에 저장할 수도 있습니다. 이 메타데이터는 재현성과 다양한 조건에서의 모델 성능을 이해하는 데 필수적입니다.
다음은 Model asset을 등록하고 모델 아티팩트를 다운로드하는 코드 스니펫입니다.
```python
def get_or_create_model_asset(ml_client, model_name, job_name, model_dir="outputs", model_type="custom_model",
download_quantized_model_only=False, update=False):
try:
latest_model_version = max([int(m.version) for m in ml_client.models.list(name=model_name)])
if update:
raise ResourceExistsError('Found Model asset, but will update the Model.')
else:
model_asset = ml_client.models.get(name=model_name, version=latest_model_version)
print(f"Found Model asset: {model_name}. Will not create again")
except (ResourceNotFoundError, ResourceExistsError) as e:
print(f"Exception: {e}")
model_path = f"azureml://jobs/{job_name}/outputs/artifacts/paths/{model_dir}"
if download_quantized_model_only:
model_path = f"azureml://jobs/{job_name}/outputs/artifacts/paths/{model_dir}/quant"
run_model = Model(
name=model_name,
path=model_path,
description="Model created from run.",
type=model_type # mlflow_model, custom_model, triton_model
)
model_asset = ml_client.models.create_or_update(run_model)
print(f"Created Model asset: {model_name}")
return model_asset
model = get_or_create_model_asset(ml_client, azure_model_name, job_name, model_dir, model_type="custom_model",
download_quantized_model_only=True, update=False)
# Download the model (this is optional)
DOWNLOAD_TO_LOCAL = False
local_model_dir = "./artifact_downloads_dpo"
if DOWNLOAD_TO_LOCAL:
os.makedirs(local_model_dir, exist_ok=True)
ml_client.models.download(name=azure_model_name, download_path=local_model_dir, version=model.version)
```
엔드-투-엔드 작업을 수행하는 핸즈온랩을 에 공개했습니다. torchtune과 Azure ML을 사용하여 파인 튜닝/평가/양자화를 쉽게 수행할 수 있기를 바랍니다.
### References
* [Azure ML Fine-tuning (Florence-2) Blog](https://techcommunity.microsoft.com/t5/ai-machine-learning-blog/fine-tuning-florence-2-for-vqa-visual-question-answering-using/ba-p/4181123)
* [Synthetic QnA Generation Blog](https://techcommunity.microsoft.com/t5/ai-azure-ai-services-blog/generate-synthetic-qnas-from-real-world-data-on-azure/ba-p/4202053)
* [torchtune official website](https://github.com/pytorch/torchtune)
* [Fine-tune Meta Llama 3.1 models using torchtune on Amazon SageMaker](https://aws.amazon.com/blogs/machine-learning/fine-tune-meta-llama-3-1-models-using-torchtune-on-amazon-sagemaker/)